| previous topic | home | next topic |

![]() If your survey contains a curve, you will need to add or insert it into the survey list using the Insert Curve button. This button will bring up a dialog that has lines for entering the necessary parameters. Enter the data as it appears on the survey and click Add Curve. The curve will be added to the survey list box. If you have a line highlighted in the survey list box, the new curve will be inserted before it. Otherwise, the curve will be added to the end of the list. The curve can be cut, pasted, and edited just like a regular straight-line survey pair, except, of course, editing takes place in the Insert Curve dialog instead of on the Survey Entry dialog.
If your survey contains a curve, you will need to add or insert it into the survey list using the Insert Curve button. This button will bring up a dialog that has lines for entering the necessary parameters. Enter the data as it appears on the survey and click Add Curve. The curve will be added to the survey list box. If you have a line highlighted in the survey list box, the new curve will be inserted before it. Otherwise, the curve will be added to the end of the list. The curve can be cut, pasted, and edited just like a regular straight-line survey pair, except, of course, editing takes place in the Insert Curve dialog instead of on the Survey Entry dialog.
The Insert Curve dialog has several radio buttons and fields for entering the parameters that define a curve. First choose whether the curve is a tangent or non-tangent curve. If it is a tangent curve, you will only need to enter the Radius and the Arc Length. If it is a non-tangent curve, you'll need to enter the Chord Bearing and enough of the additional parameters to adequately define the curve. These could include the Chord Length, Radius, Arc Length, and Delta. Finally, choose whether the curve veers to the right or to the left before entering it into the survey list. If you have not entered adequate information, you will be prompted to do so.
|
A tangent curve is one where the preceeding survey course (and often the following one too) is tangent to the imaginary circle that the curve is part of. A non-tangent curve is any curve where this is not true.
You may notice that there is no little | 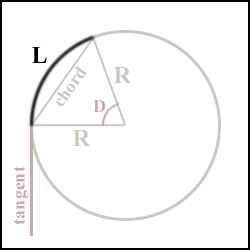
|
| previous topic | home | next topic |
 in the upper-right-hand corner of this dialog; use the 'Cancel' button to close it if you decide not to enter a curve. If for some reason you get trapped and the button doesn't work, you can hit the Esc key to close the dialog as a last resort.